


If you’ve noticed your cheeks starting to descend — in photos, in the mirror, or just in the way your face feels heavier than it used to — you’re probably wondering what’s actually causing it. And whether there’s anything you can do that doesn’t involve a procedure.
The answer to both questions is more straightforward than most people expect.
What’s Really Happening Beneath the Surface
The position of your cheeks is largely determined by the zygomaticus major — a muscle that runs from your cheekbone down to the corner of your mouth. When this muscle is toned and active, it supports the mid-face and keeps everything sitting where it should.
Over time, without targeted use, this muscle loses volume and tone. The fat pads that once sat high on the cheekbones gradually shift downward. The result isn’t primarily a skin problem — it’s a structural one. And that distinction matters, because it changes what actually helps.
Creams and serums work at the surface. But the lift in your cheeks comes from what’s underneath. That’s what face yoga addresses directly.
The 2018 Northwestern University JAMA Dermatology study confirmed this: participants who practiced targeted facial exercises for 20 weeks showed measurable improvements in upper and lower cheek fullness, with independent evaluators rating their apparent age as notably younger by the study’s end.
I hear from Face Yogis in their 20s and 30s who are surprised to be noticing this already. Sagging cheeks aren’t exclusive to later decades — screen time, sleep position, jaw tension, and muscle disuse all contribute regardless of age. The earlier you address these, the easier the work.
If your cheeks have descended after losing weight, the mechanism is slightly different — the fat volume that was supporting the mid-face has reduced. But the muscle work still applies. Strengthening the zygomaticus major provides structural lift that doesn’t depend on fat volume.
5 Habits That Are Making It Worse
Most women I speak to are focused entirely on what to add to their routine. But there are daily habits that quietly accelerate cheek descent — and most people have no idea they’re doing them.
1. Sleeping on your side or face-down
When you sleep with your face pressed into a pillow night after night, gravity pulls the cheek tissue downward and inward for hours at a time. Over years, this compounds. If you’ve noticed one cheek sitting noticeably lower than the other, your sleep position is often a significant contributing factor. A silk pillowcase reduces friction considerably — and sleeping on your back, even a few nights a week, makes a real difference over time.
2. Resting your face on your hand
An easy habit to develop at a desk, during a call, or watching something at the end of the day. But resting your cheek in your palm applies consistent downward pressure on the mid-face tissue and the muscles beneath it. Over time, this works directly against the lift you’re trying to build.
3. Chronic jaw tension
When the masseter muscle — the large chewing muscle along the jaw — is chronically tight, it pulls on the surrounding tissue and restricts natural movement in the mid-face. Many Face Yogis carry significant tension here without realising it, particularly if they grind their teeth or clench during stressful periods. Releasing this tension before any strengthening work is essential — it’s why the Lower Cheek Release is always the first step in the sagging cheeks practice.
4. Looking down at screens for long periods
When your head tilts forward and your chin drops — which is the natural position for most of us looking at a phone or laptop — the facial muscles spend hours in a shortened, compressed position. The mid-face loses the postural support it needs. Over time this contributes to a heaviness in the lower face that no amount of exercise fully corrects without also addressing the posture driving it.
5. Not moving the mid-face muscles at all
The face is the only part of the body where muscles attach directly to the skin — which means muscle tone has a direct, visible effect on how the face looks. When the zygomaticus major and surrounding mid-face muscles go without targeted use, they lose volume gradually. The result is the flat, descended look that most people attribute purely to age, when it’s largely a question of disuse.
What Real Progress Looks Like
I’ve worked with over 764,000 Face Yogis worldwide, and this is one of the most common concerns I hear — especially from women who feel like the change happened gradually and then all at once.
What I see consistently: the mid-face starts to respond within the first few weeks of targeted practice. By weeks 8 to 12, the overall position of the cheeks has visibly shifted — and it’s the kind of change other people notice before they can quite articulate why.
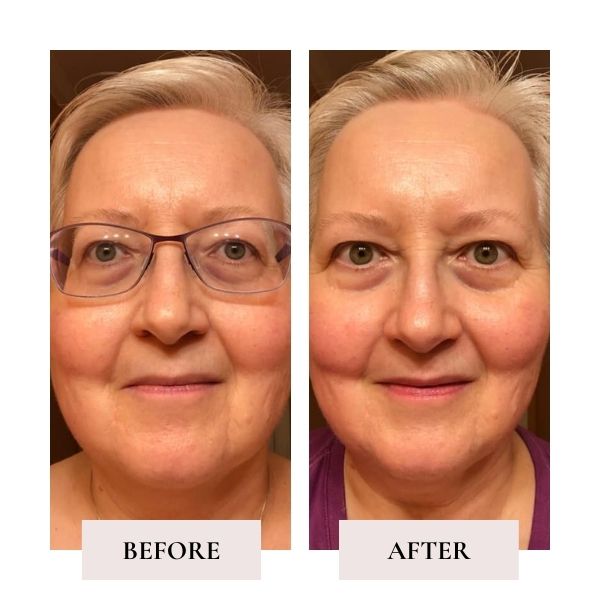
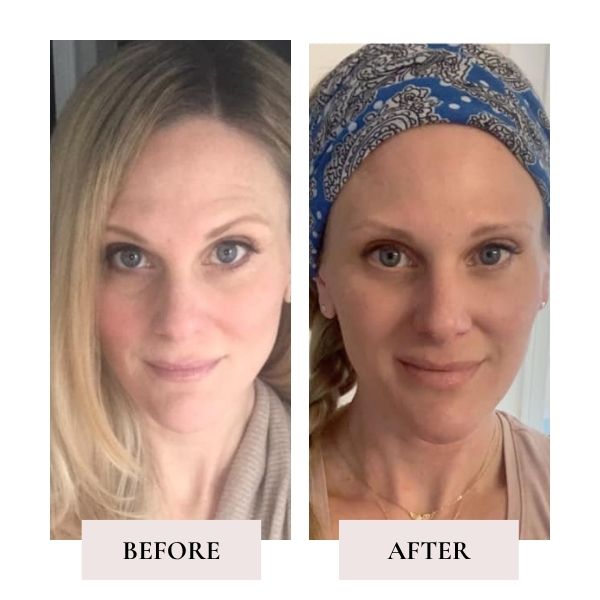
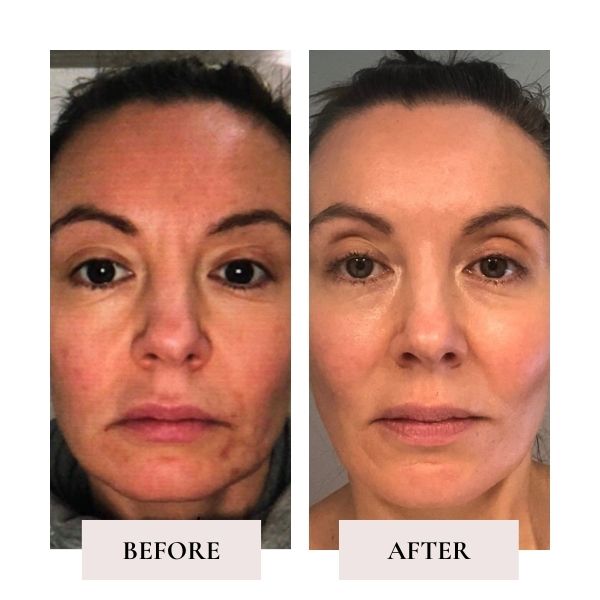
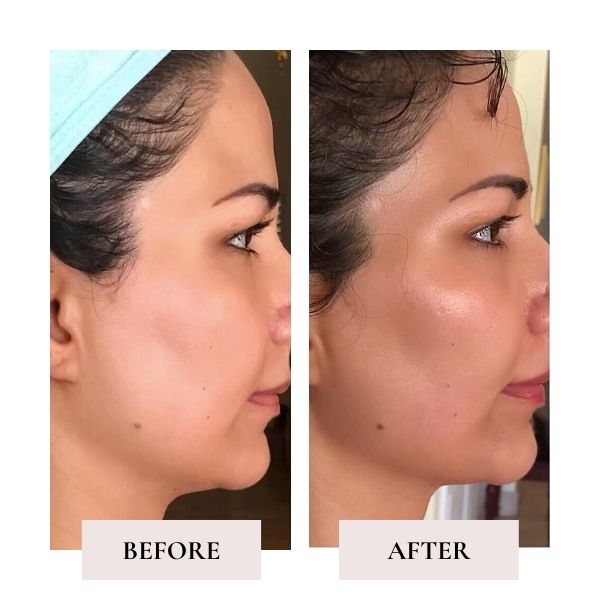
“You do not need fillers! Try Fumiko’s Cheek Lifter moves and teach your face to smile using your cheeks. Aim the corners of your mouth towards your upper molars. And keep trying, it can take a bit to find those cheek muscles.” — Barb
“It’s amazing how different the side of the face that’s been worked on feels compared to the other side yet to be worked on. It just goes to show how our face muscles literally sleep throughout the day! No wonder they eventually sag and make us look older.” — Katya
The 1 Move To Start Today
Of everything in the sagging cheeks practice, the Cheek Lifter is the one I return to most — because it trains the zygomaticus major in the exact upward direction your cheeks need to move.
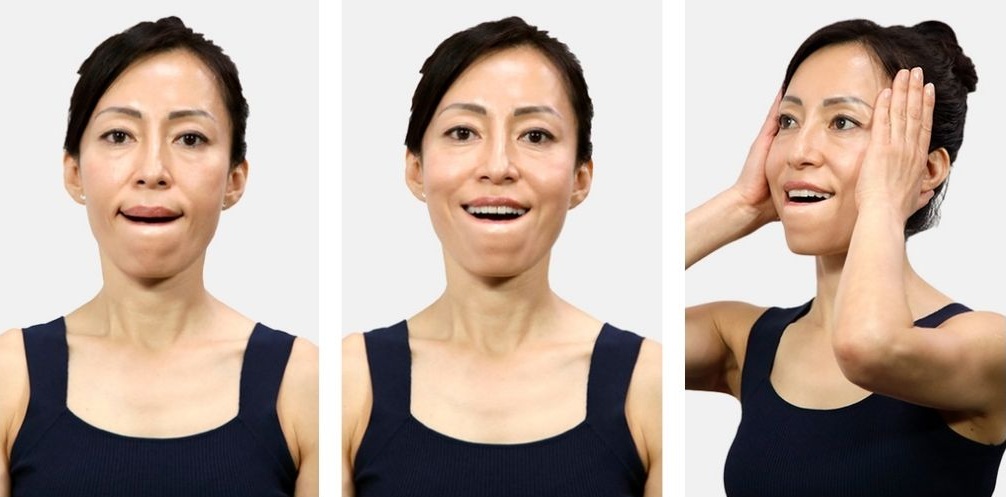
- Sit tall, relax your neck and shoulders, and breathe through your nose.
- Open your eyes wide without wrinkling your forehead.
- Curl your lower lip around your lower teeth and press your upper lip firmly against your upper teeth.
- Pull both corners of your mouth toward your molar teeth — keeping both sides level.
- Move your chin slightly forward, place both palms on your cheeks, and move them upward at a 45-degree angle.
- Hold for 10 seconds, then release.
One cue worth paying close attention to: keep both corners of your mouth at exactly the same level throughout. Most faces carry a slight asymmetry — one cheek sitting marginally lower than the other. Training with both sides level is how you address that over time.
Worth Remembering
None of these habits are things to feel bad about. Most develop completely unconsciously — and simply becoming aware of them puts you ahead of where most people are.
Pair that awareness with consistent targeted movement, and the results build in a way that lasts. Not overnight, but in a way that’s real and yours.
Ready to Bring Your Cheeks Back?
The Cheek Lifter is a strong start. But lasting results require the right sequence — release first, then strengthen, then sculpt. That’s exactly what the Bring Back Your Cheeks Challenge is built around.
Five days. Twenty minutes a day.
Your cheeks didn’t go anywhere. Let’s bring them back.